
Custom Brushes:
Apart from the various brushes that are already available in Photoshop, dealt with in previous lessons, even brushes that draw pictures of leaves or butterflies for instance, you can create your own!
Example 1: Creating a custom brush using your own small drawing -
1. Draw a small design on Photoshop using a normal brush (use black for colour).
 just a scribble will do to practice.
2. Now use the Magic Wand to select the image.

3. Now go Edit / Define Brush Preset:

4. Now give the new brush a name:

 ... then click OK
5. Now click on the Brush Tool:

Now your new brush should show in the brush list:

Choose your brush. Now you can draw with it.

6. Now click on Brush tab (or Brushes, depending on the version you are using) on the right-hand side of your Photoshop. If you don't see this tab, click on Window, the Brush (or Brushes). Now you can play with settings, such as spacing the brush, changing the angle, etc.

 Spacing
 Random angle
 Scattering
Another way to create a brush is to use the Custom Images already available in Phothshop. This is a little bit more complicated though, as Photoshop does not allow you to select a Custom Shape if you don't modify it accordingly. The following steps will teach you how:
1. Choose an image from the Custom Images selection:


3. Now if you try to use the Magic Wand to select it you will notice that you are not allowed:

4. So...select the shape layer:

Now click on Layer / Smart Object / Convert to Smart Object

Now your shape layer is showing differently:

Lastly, now you are allowed to select the image, and you can create your custom brush with it!
__________________________________________________
Create a website using Photoshop:
Note - A basic knowledge in web-design helps here but it is not mandatory.
The first step is drawing the website interface. This you can do very easily now that you have done all the course up to this point!
Things to keep in mind: When opening a new document in Photoshop make sure that you choose a page size that would allowe visitors to your website to view it properly. You need to make allowance to those who still use a computer with a resolution of 800x600. Therefore I suggest a width of 790 and a height of 590 to make sure that it fits. There is not hard fast rule though. Maybe one day soon you can be certain that nobody anymore uses a 800x600 resolution and so you can feel free to revert to a larger format!
So, step 1:
Open a new Photoshop document.

Step 2:
Choose the rounded corner square from the custome shapes.

Pay attention: if you choose the have a dark coloured rectangle obviously you would then need to write in light coloured text on it such as in white or in yellow (maybe even a very light grey would do).

You can always have your background colour dark and leave your rectangle white. It is just a question of taste and creativity.
Step 3:
Now you can create the title. This depends on the subject of your website. Let's say it is about the History of Malta.

At this moment don't worry that the title is not visible well on a white background.
You can resize the title by using Edit/Transform/Scale:

Lastly you can add a drop shadow to the title [Layber/Layer Style/Drop Shadow]

This helps to make the title even more readable.
Step 4:
Create the navigation buttons. You well know that a website needs some sort of navigation so that one can go from one page to another. Most of the time this is found on the left hand side - but again it is actually up to you where to put the navigation buttons (normally they are not at the bottom of the screen though - if not to suppliment those already available on the left hand side).
All we need to create the buttons is a rounded rectangle (or a normal rectangle) shape, and text on top of it!

To create the other buttons you can simply Duplicate the layer and then just add the text to it. You can do this by Right-clicking on the layer and choosing Duplicate Layer:

Click OK:


Now add the text you desire onto the new button. Repeat the procedure as much as needed to create the full navigation set of button.
You can now decorate further your design by adding images, using brushes or by even deleting parts of the edge to create a worn and old effect.
 Torn effect using the eraser tool.
It is important that you keep in mind that the area on the right will contain the body of the website, therefore it should be left intact.
 Decorated with one of the built in brushes.
Slice One: Draw a rectangle around the title area with the slice tool (just by dragging):


Step 6 - Saving:
Now that you are ready you need to save your work. Save it as .psd for later editing. Then save it for the web...
First create a Folder on your desktop or anywhere you find convenient, then..
Go to FILE / Save for the Web (Photoshop CS5 users will find it as "Save for Web & Devices"). Do not touch any settings - leave everything as default.


Now click on the Save button.

Lastly select the folder you are saving it in and the click on the OPEN button and then on the SAVE button. PhotoShop will save a folder called Images with the sliced design you just created and an HTML page (web page) which includes in it your design - each sliced piece of your design inserted in a cell, part of a table.
Step 7:
Editing in SharePoint Designer 2007 (do not download the 2010 version because it is intended to be used on servers not as a standalone application). SharePoint Designer 2007 is free to download. You can download it from [HERE]
NOTE: All Maltese state school teachers have SharePoint designer already installed on their laptops. It is found under All Programs / Microsoft Office.
Open SharePoint Designer. The go File / Open Site:

Select the folder where you previously saved your PhotoShop work:

Then click on the Open button.
You will get the following result:

On the left hand side you should see the Folder List panel. If you don't see it, click on View / Folder List from the top menu bar.
The first page of a website cannot be named ANYTHING you wish. It can only be named one of two names, index.html or default.html - this despends on the hosting service one makes use of.
NOTE: If you teach in a Maltese state school then you are entitled to free webspace on schoolnet.gov.mt. Just contact Rose Anne Xerri at roseanne.xerri@gov.mt to apply for your free webspace.
In the case you are using the Schoolnet free hosting as teachers, you will need to rename the first page to default.html (instead of websitePhotoshop.html as it is presently in this example).
If you are paying for your own webspace, then it is most probably index.html and not default.html - but the company from where you bought your webspace will inform you which to use anyway.
Step 7a:
Rename your page simply by right-clicking on it and choose rename. For this example we will opt for default.html - please when renaming select (highlight) only the part of the name PRECEDING the .html extension. Otherwise if you delete also the extension the file will not be usable.


Click yes for the above question.

This is what you get after renaming. Now you can open the page by double clicking on default.html (either from the Folder List or from the middle part of the screen).
Don't be scared if you get the code as shown below...

...at the bottom of your SharePoint Designer interface you get 3 tabs: Design, Split, Code. We need to now click on the Design tab. Now you can see your design represented in SharePoint Designer.

If you click on different areas you will realise that all sliced are embedded in cells, part of a larger table.
Now click on the rectangle / square area...

...and click on the Delete button on your keyboard. You have just removed the sliced image and you will end up with a blank white space.

Step 9:
Now to create some pages. This is easy. Just click on the New Page button on top of the Folder List panel:


Rename the page to Welcome or Home or anything suitable. Remember - don't remove the .htm part of the name!
Repeat to create the Prehistory page (obviously rename it as prehistory.htm).
Step 10:
Click once in the blank white area. Now click on Insert from the top menu bar. Then choose HTML and Inline Frame from the resultant list.

After this you will see a box in the middle of the white area:

Resize the frame to fill the whole white area:

Now click on Set Initial Page. Set the page to be the welcome.htm or whatever you named it.

You can now write something in this area. If you double-click on welcome.htm through the Folder List you will see that whatever you wrote in this area will also show on the page.

Next step is to link to the Prehistory page and any other pages you might need to add. This is really easy...
Click on the Preshistory button.
Right-click on it. Choose Hyperlink.

Now choose Prehistory.htm from the list of pages:
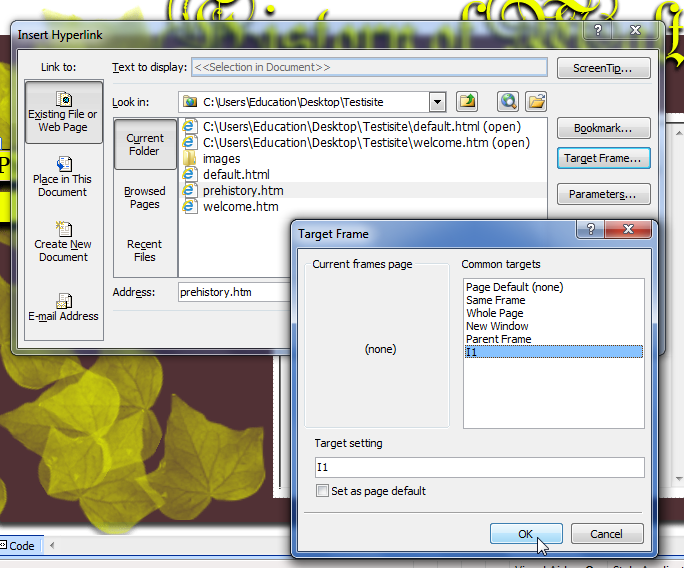
Next click on the Target Frame button and from the list choose I1 (which is the name of the iFrame or inline frame), and click the OK button.
Check that all is working properly but minimising everything, and from the folder where your files reside, choose the default.html file and double click on it.
No comments:
Post a Comment
Add you comment/question here.