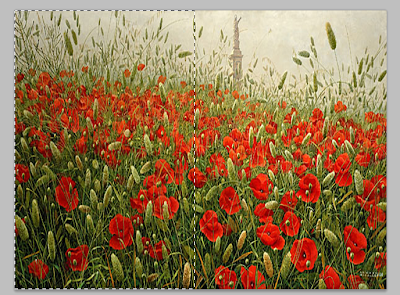
The Layer Mask tool:
This tool is found at the bottom of the Layers window:
With this tool, and in combination with the gradient tool, you can achieve special effects such as merging two images on top of each other as in the example below:
Step1: Save the Lilly picture on your Desktop (found in previous lessons).
Step2: Save the Poppies picture on your Desktop (found at the beginning of this lesson).Step3: Open the Lilly picture in Photoshop.
Step4: Open the Poppies picture in Photoshop. CTRL+A (to select All), then CTRL+X to cut the picture. Minimise your window and you will see the Lilly picture now.
Step5: Create a new Layer - this is explained in an earlier lesson.
Step6: Paste the Poppies picture onto the new layer.Step7: Now click on the Add Layer Mask button (shown at the top on this page).
Step8: Click on the Gradient tool. Choose the gradient named Foreground and Background (black and white colours) - drag your mouse as if drawing a gradient fill over the picture.
Experiment with various directions to get the result you desire.
_____________________________________________________
Custom Shapes:
Note: You can get any of the shapes in the image above showing as it all depends on which tool you had used the last time. So if you see any of the other shapes just click on the bottom corner and you will get a selection as in the image above. If you had used the Custom Shape previously then you would see the star shaped icon (marked with the red oval above).
After selecting the Custom Shape tool, the top toolbar in Photoshop changes accordingly as always:
Now to view the list of shapes you have available, click on the arrow indicated by the red rectangle above. To add more pictures click on the arrow indicated by the red square above.
Before using shapes (if you want to have a solid shape and not just a path), make sure that you have selected the Shape Layer botton as shown below:
_____________________________________________________
Brushes:
You can access your brush tool as in the image below:
As usual the top toolbar changes accordingly:
When you click the arrow marked with a red circle, you will get a list of options, mainly the thickness and hardness of the brush and the brush type. You view the brush types available by moving the scroll bar at the right hand side. You can even add more brushes by clicking the small black arrow marked by the white arrow above.
There are certain special brushes that make your work really easy because they produce images such as butterflies, leaves etc - so they may come very handy especially when designing a greeting card or a poster for example.
____________________________________________________
The Warp Tool can be really fun - you can use it on the photograph of your friend for example - and make him/her look really funny!
To access the Warp tool, first you need to have a selection. To apply the warp to the whole picture you can either click on CTRL+A (Select All) or use the rectangular marquee tool. You can choose just parts of the photography using the Lasso tools or the pen tools (remember after using the pen tool you need to go on Paths and choose Make Selection)
Next go to Edit, Transform, Warp.
Don't forget to click on the Tick mark on top of your screen to accept the changes.
____________________________________________________
Peeling picture trick using the Warp tool:
We will be using the Poppies picture on top of this lesson. Any image obviously will do though.
1. Open the picture in Photoshop.
2. Right click on the picture layer and choose Duplicate Layer (this way you have a two copies of the same picture in different layers).
3. Click on OK on the window that appears.
4. Click on the bottom (Background) layer, and do some changes to it, such as add Brighness, or add a Filter etc so that it looks a little different than the top layer.
6. Choose the Warp Tool:
7. Drag the point at the top right corner to the left side:
8. Click on the Tick mark on top of the screen and CTRL+D to deselect. Now repeat the same procedure for the other half of the picture.
This is the finished result:
You can select the traingular parts, use a layer mask, and apply a gradient so that you will give the curved part of the peeling triangle a more realistic look. As it is though it already looks good.
____________________________________________________
Adjustment Curves:
You can access Adjustment Curves from Image, Adjustment, Curves:
With these curves you can adjust certain aspects of a picture - just by dragging them:


No comments:
Post a Comment
Add you comment/question here.